Craving a taste of the tropics? This easy coconut shrimp recipe delivers crispy, golden perfection with a hint of sweetness that will transport you to a sun-kissed beach. This dish is surprisingly simple to make at home, offering a delightful appetizer or main course option that’s sure to impress. For more inspiration, check out our other seafood recipes, and for a deeper dive into the art of frying, Serious Eats offers a comprehensive guide to achieving the perfect crisp.
Why You’ll Love This Coconut Shrimp:
- Quick & Easy: Ready in under 30 minutes, perfect for busy weeknights or impromptu gatherings.
- Crowd-Pleasing Flavor: The sweet coconut coating paired with savory shrimp is a guaranteed hit with kids and adults alike.
- Versatile: Serve as an appetizer with dipping sauce, add to tacos, or enjoy as a main course with rice and vegetables.
- Homemade Goodness: Skip the frozen stuff and savor the fresh, delicious taste of homemade coconut shrimp.
Ingredients You’ll Need for the Coconut Shrimp
Primary components: Large shrimp (peeled and deveined), shredded coconut (sweetened or unsweetened), all-purpose flour, eggs.
Liquids & seasonings: Vegetable oil (for frying), salt, black pepper, garlic powder, paprika.
Optional add-ins: Panko breadcrumbs (for extra crispiness), cayenne pepper (for a touch of heat), lime wedges (for serving), your favorite dipping sauce.
If you enjoyed this, you might also love our Air Fryer Chicken Tenders Extra Crispy recipe.
Note: The exact ingredient quantities appear in the printable recipe card below.
How to Make Coconut Shrimp
This coconut shrimp recipe is easier than you think! You’ll start by prepping your shrimp and setting up a simple breading station. Then, a quick dip in the flour, egg, and coconut mixture, followed by a short stint in the hot oil, and you’ll have crispy, golden shrimp in no time. For best results, choose a high-heat oil like vegetable or canola oil.
Step 1: Prepare the Shrimp
Gently pat the shrimp dry with paper towels. This helps the coating adhere better. If desired, you can butterfly the shrimp by slicing along the back, but not all the way through, to create a wider surface for the coconut.
Step 2: Set Up the Breading Station
Place the flour in a shallow dish and season with salt, pepper, garlic powder, and paprika. In a second shallow dish, whisk the eggs. In a third shallow dish, place the shredded coconut. If you’re using panko breadcrumbs, mix them with the coconut for extra crunch.
Another favorite of ours is the Viral Honey Butter Toast 4 Ingredients.
Step 3: Bread the Shrimp
Dredge each shrimp in the flour mixture, making sure to coat it evenly. Then, dip it in the whisked eggs, allowing any excess to drip off. Finally, coat the shrimp generously with the shredded coconut (and panko, if using), pressing gently to help it adhere.
Step 4: Fry the Shrimp
Heat about 1/2 inch of vegetable oil in a large skillet over medium-high heat. The oil is ready when a small piece of breadcrumb sizzles and turns golden brown in about 30 seconds. Carefully add the breaded shrimp to the hot oil in a single layer, being careful not to overcrowd the pan.
Step 5: Cook to Golden Perfection
Fry the shrimp for about 2-3 minutes per side, or until golden brown and cooked through. The internal temperature of the shrimp should reach 145°F (63°C). Use a slotted spoon to transfer the cooked shrimp to a wire rack lined with paper towels to drain excess oil.
Another favorite of ours is the Viral Japanese Cream Sandwiches Tokyo.
Pro Tips for Making Coconut Shrimp:
- Don’t Overcrowd the Pan: Fry the shrimp in batches to maintain the oil temperature and ensure even cooking.
- Use a Thermometer: For perfectly cooked shrimp, use a meat thermometer to check the internal temperature.
- Keep it Warm: Place the fried shrimp in a warm oven (200°F) while you finish frying the remaining batches.
- Spice it Up: Add a pinch of cayenne pepper to the flour mixture for a little kick.
Variations & Serving Ideas
This coconut shrimp recipe is fantastic as is, but feel free to get creative! Consider using different types of coconut, like toasted coconut flakes, for a nuttier flavor. Get creative with dipping sauces.
- Serve with a sweet chili sauce, mango salsa, or a creamy pineapple dipping sauce.
- Add the coconut shrimp to tacos with shredded cabbage, avocado, and a drizzle of lime crema.
Storage & Reheating
Leftover coconut shrimp can be stored in an airtight container in the refrigerator for up to 3 days. For best results, reheat in a skillet over medium heat or in an air fryer to restore crispness.
Final Thoughts
This coconut shrimp recipe is a delightful way to bring a taste of the tropics to your kitchen. With its crispy texture, sweet coconut flavor, and easy preparation, it’s a recipe you’ll want to make again and again. We hope you enjoy this recipe as much as we do! Don’t forget to leave a comment and rating below to let us know how it turned out!
For more details on Air Fryer Beef Tips and Gravy, check out Air Fryer Recipes.
FAQs About Coconut Shrimp
Question: Can I use frozen shrimp for this recipe?
Yes, you can use frozen shrimp. Just make sure to thaw them completely and pat them dry before breading.
Question: Can I bake the coconut shrimp instead of frying?
Yes, you can bake the coconut shrimp. Preheat your oven to 400°F (200°C) and bake for 12-15 minutes, or until golden brown and cooked through. For extra crispness, place the shrimp under the broiler for the last minute or two, watching carefully to prevent burning.
Question: What is the best oil for frying coconut shrimp?
Vegetable oil, canola oil, or peanut oil are all good choices for frying coconut shrimp due to their high smoke points.
See also: airfried.
Question: Can I make coconut shrimp ahead of time?
You can bread the shrimp ahead of time and store it in the refrigerator for up to 2 hours before frying. However, it’s best to fry the shrimp just before serving for optimal crispness.
Question: What dipping sauce goes well with coconut shrimp?
Sweet chili sauce, mango salsa, pineapple salsa, or a creamy coconut-lime dipping sauce are all excellent choices.
Question: Can I use unsweetened coconut?
Yes, you can use unsweetened coconut. You may want to add a tablespoon or two of sugar to the coconut mixture to compensate for the lack of sweetness.
Print
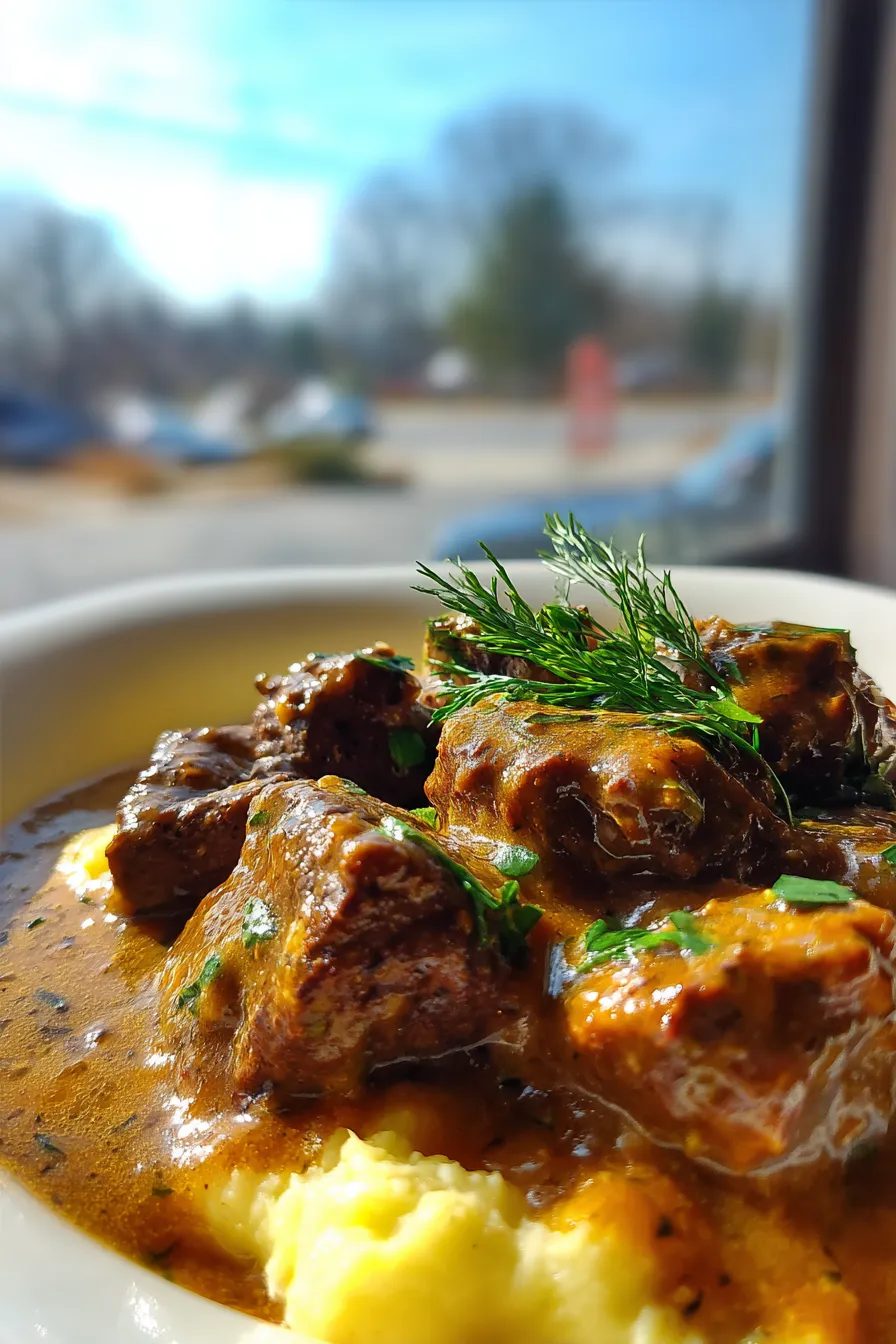
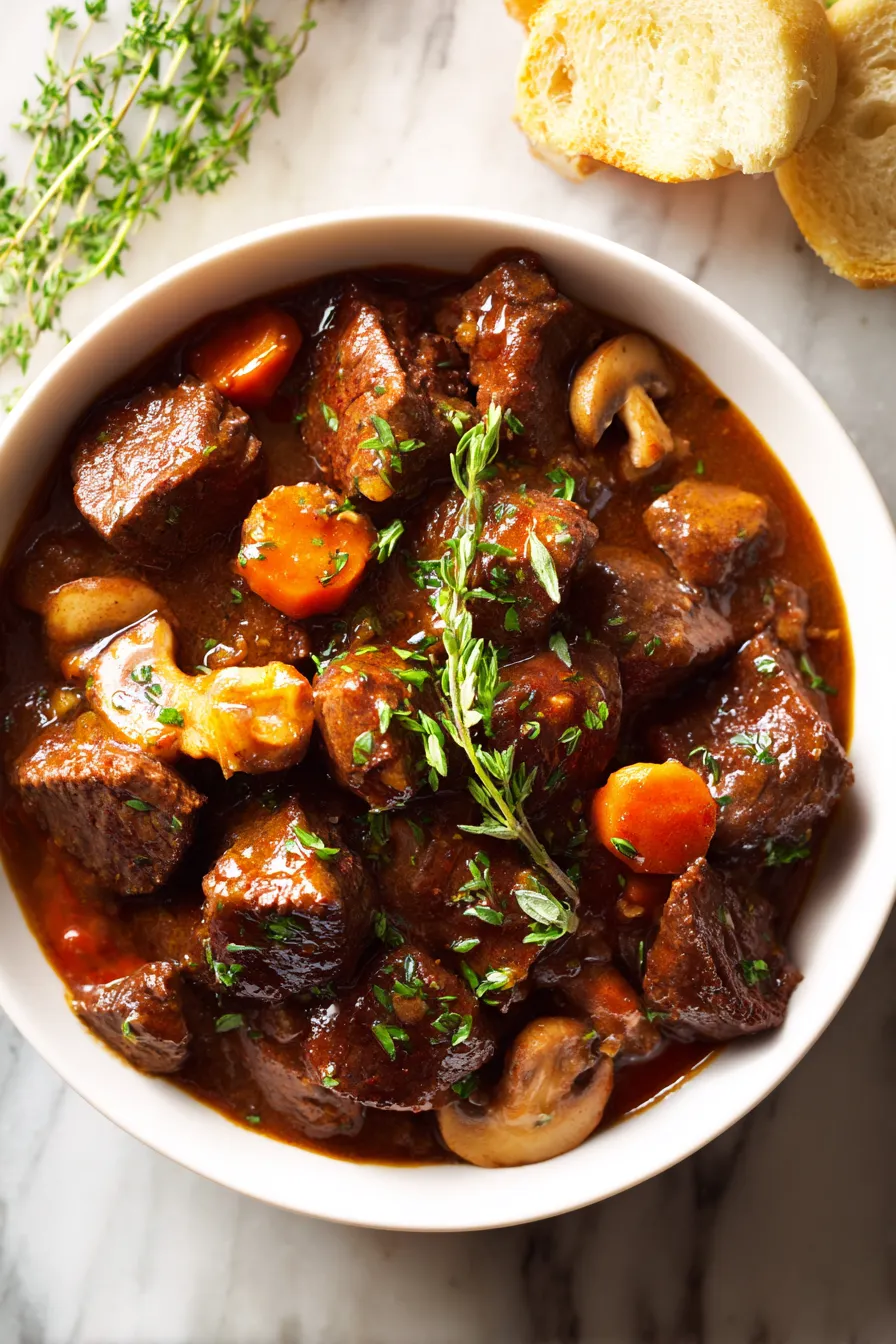
Air Fryer Beef Tips and Gravy Easy Comforting Weeknight Win
- Total Time: 30 minutes
- Yield: 4 servings 1x
- Diet: Gluten-Free (use gluten-free flour)
Description
Tender beef tips cooked in the air fryer and smothered in a rich, savory gravy. This quick and easy recipe delivers a comforting and flavorful meal in under 30 minutes.
Ingredients
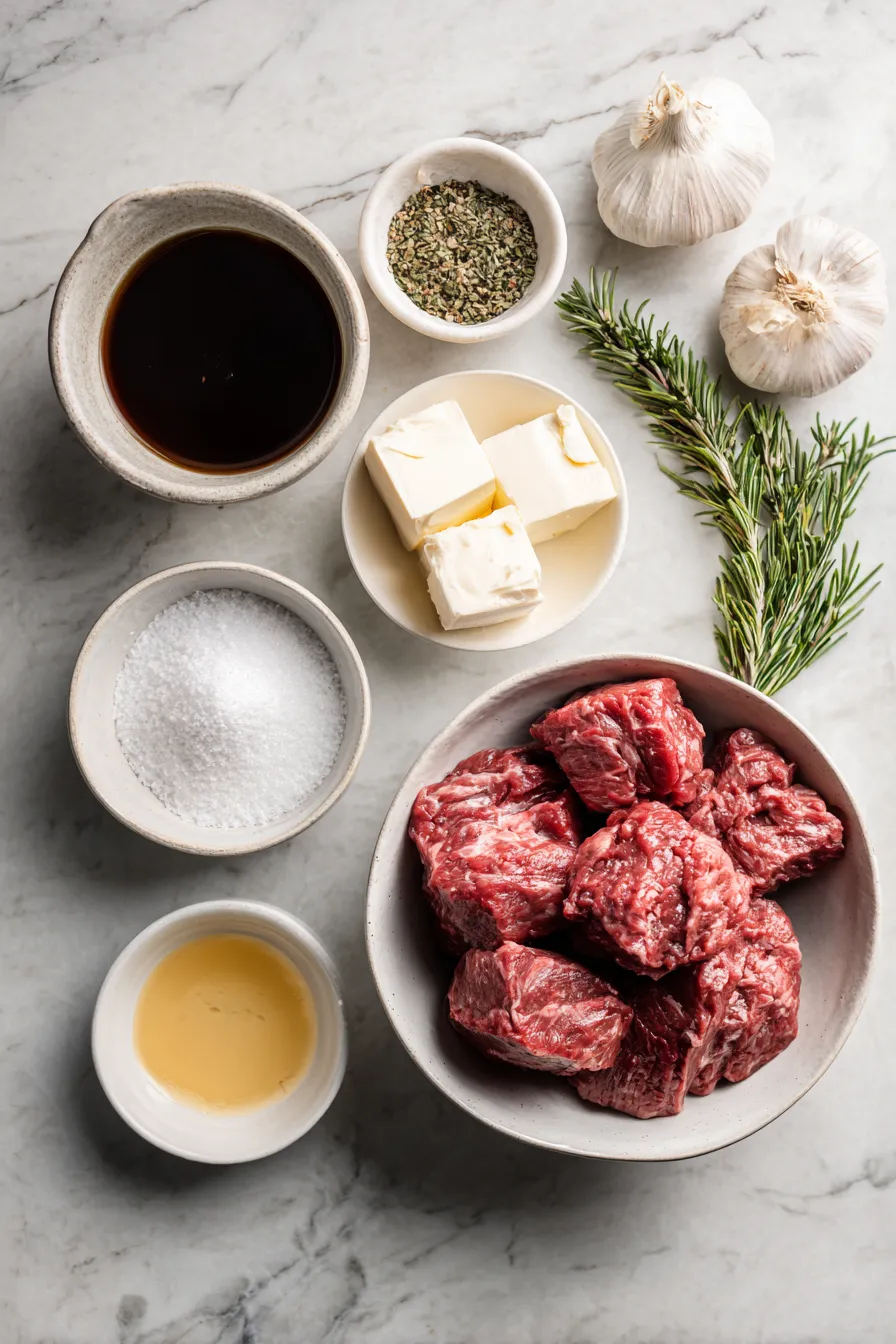
- 1.5 lbs beef sirloin, cut into 1-inch cubes
- 1 tbsp olive oil
- 1 tsp garlic powder
- 1 tsp onion powder
- 1/2 tsp dried thyme
- 1/2 tsp dried rosemary
- 1/4 tsp salt
- 1/4 tsp black pepper
- 2 tbsp butter
- 2 tbsp all-purpose flour
- 2 cups beef broth
- 1 tbsp Worcestershire sauce
- 1/2 tsp Kitchen Bouquet (optional, for color and flavor)
Instructions
- Preheat your air fryer to 400°F (200°C).
- In a large bowl, toss the beef cubes with olive oil, garlic powder, onion powder, thyme, rosemary, salt, and pepper. Ensure the beef is evenly coated.
- Place the beef tips in the air fryer basket in a single layer, being careful not to overcrowd. You may need to cook in batches.
- Air fry for 8-10 minutes, or until the beef tips are cooked to your desired doneness. For medium-rare, aim for an internal temperature of 130-135°F (54-57°C).
- While the beef is cooking, prepare the gravy. In a medium saucepan, melt the butter over medium heat.
- Whisk in the flour and cook for 1-2 minutes, stirring constantly, to create a roux.
- Gradually whisk in the beef broth, making sure to break up any lumps.
- Stir in the Worcestershire sauce and Kitchen Bouquet (if using).
- Bring the gravy to a simmer and cook for 5-7 minutes, or until it has thickened to your desired consistency. Season with salt and pepper to taste.
- Once the beef tips are cooked, add them to the gravy and stir to coat.
- Serve immediately over mashed potatoes, rice, or noodles.
Notes
- For best results, use high-quality sirloin or tenderloin beef.
- If you don’t have Kitchen Bouquet, you can substitute a teaspoon of soy sauce or a dash of balsamic vinegar for added depth of flavor.
- Adjust cooking time in the air fryer depending on your desired level of doneness.
- If the gravy becomes too thick, add a little more beef broth to thin it out.
- Store leftovers in an airtight container in the refrigerator for up to 3 days. Reheat gently on the stovetop or in the microwave.
- Prep Time: 10 minutes
- Cook Time: 20 minutes
- Category: Main Course
- Method: Air Fryer
- Cuisine: American
Nutrition
- Serving Size: 1 serving
- Calories: 450
- Sugar: 3
- Sodium: 600
- Fat: 25
- Saturated Fat: 10
- Carbohydrates: 15
- Fiber: 2
- Protein: 40
- Cholesterol: 150